
- Create a new blank game project (I’ll call mine NSSDemo)
- Enable the NevertopShooting and MassGameplay plugins then restart the editor
- In the content browser, open the Engine dropdown and find the NeverStopShooting plugin. Copy the entire NeverStopShooting folder into your projects Content folder then close the Engine dropdown
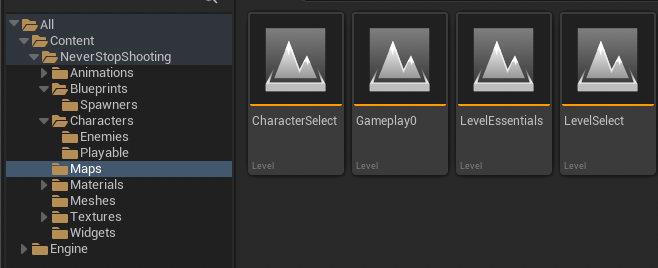
- Go to your NeverStopShooting/Maps folder and create 3 empty maps. Name them: LevelSelect, CharacterSelect and Gameplay0
- Add a new folder to your NeverStopShooting folder called Characters. Inside that create two more folders called Enemies and Playable, respectively
- Under your Animations folder create a folder called AnimBP
- Your project structure should look like this at this point
- Go to your Blueprints/Spawners folder and create a new blueprint class deriving from NSSPlayerSpawnerAuto
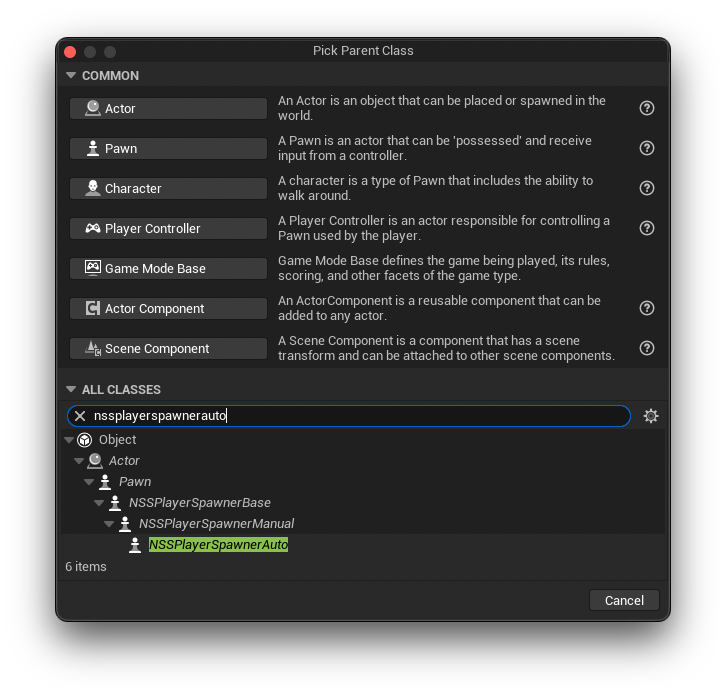 Call it BP_PlayerSpawnerAuto
 - Open your BP_NSSGameModeAutomatic blueprint and set your new BP_PlayerSpawnerAuto blueprint as the Default Pawn Class
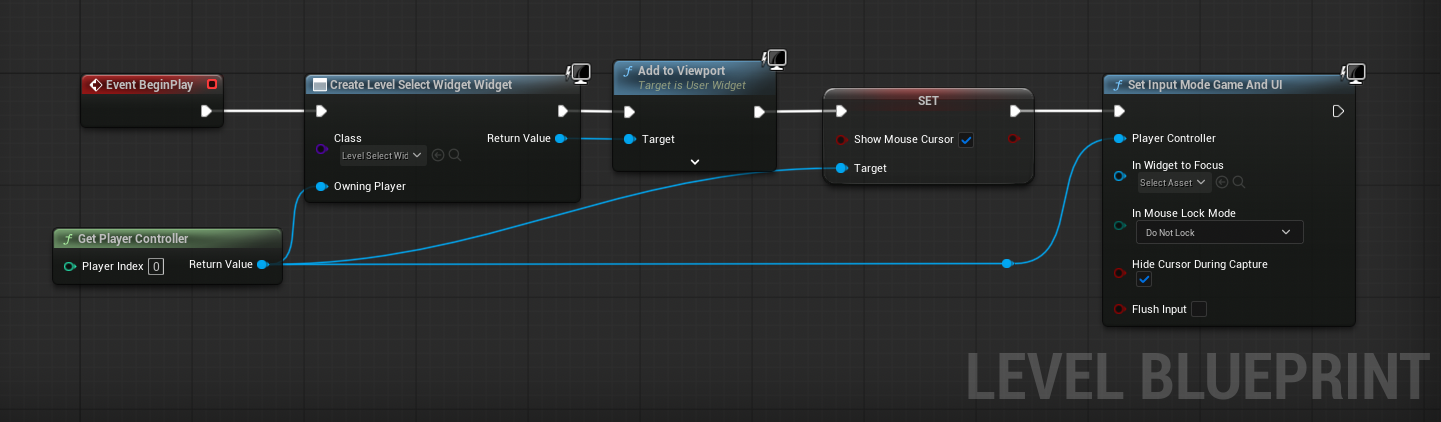
- Open up LevelSelect and then open the LevelBlueprint. Set it to load the LevelSelect_Widget on BeginPlay
- In the WorldSettings panel select BP_PlayerSelectionGameMode *1 as the GameMode Override
- Open the CharacterSelect map and in WorldSettings also set it override the game mode with BP_PlayerSelectionGameMode but in the level blueprint make it load the PlayerSelection_Widget.
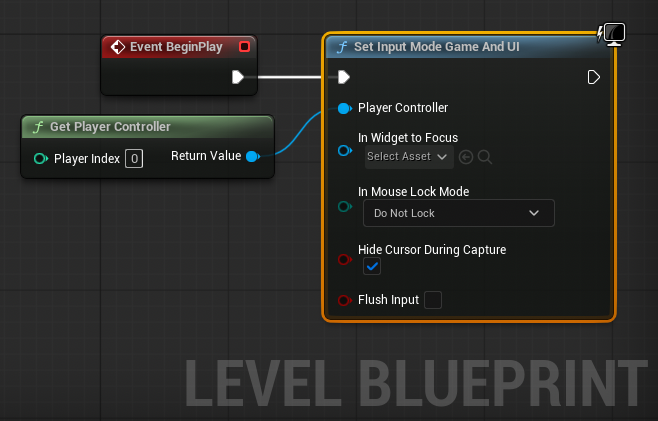
- Open Gameplay0 and open the LevelBlueprint. Set GameMode to GameAndUI for the current PlayerController
- Open the Levels window and Select AddExisting from the dropdown. Add “LevelEssentials” to your map.
*1 Setting the level select map to use the player selection game mode will cause the player selection background props to displayed faded out in the background. Then switching to the character select map will give the appearance of the background now coming into focus. Alternatively, you could create a separate GameMode for this map and set the Default Pawn Class to None
Create a new folder called Inputs. Inside that create 2 Input Actions by right clicking in the folder and clicking on Input->InputAction
Call the first one IA_ChangeCamera and call the second one IA_Horizontal
Double click the second one and set it’s Value Type to Axis2D
Right click and click on Input->InputMappingContext
Call it IMC_PlayerMovement
Open it up and under DefaultKeyMappings add your two input actions. From here configure them to use whatever inputs and buttons you like. For IA_ChangingCameras I chose Keyboard SpaceBar button. For IA_Horizontal I chose the A and D keys with Negate modifier on the A key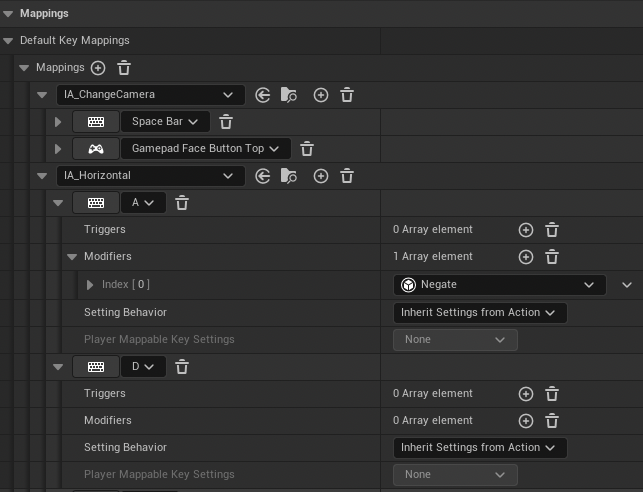
- Go to your Blueprints folder and create a new folder called Projectiles.
- Create a new blueprint deriving from NSSProjectileBase
- Call it BP_ProjectileBase
- Open it up and add a Sphere collision component and scale it to 0.5. Select it in the components panel and in the details panel make sure:
* Simulate Physics is turn off
* Simulation Generates Hit events is turned off
* Generate Overlap Events is turned on
* Collision Preset is set to custom. Everything should be set to Ignore except WorldStatic, Pawn and Destructible which should be set to Overlap - OPTIONAL Add a sphere and scale it to 0.3 (If you add a sphere here it will appear in all subclasses also. Add it for now but once you start creating custom projectiles remove this)
- Add a ProjectileMovement component to it and select it in the Components panel
- In the details panel set its initial speed to 2500 and it’s max speed to 10000. Set projectile gravity to 0 and ShouldBounce to false
Add characters and animations and AnimBlueprint
You can use any skeletal mesh asset from Fab or elsewhere as your playable character but for this tutorial I will be using a Paragon character since it already comes with the needed animations. Your character will need animations for strafing, idling and firing their weapon
- Import your character and its animations. In this case I am importing Lt. Belica
- Locate / create your characters animation blueprint and move it to your Animations/AnimBP folder
- As long as your character can move you can leave the AnimGraph as is but be sure to remove the aim offset.

- In the EventGraph I keep the BlueprintUpdateAnimation node untouched since that takes care of playing moving character animations. I delete everything else
Modify the firing animation
- From the Asset Browser panel select a firing animation and double click it to open it up
- Find a location in the animation that you like and add a new EventNotify on the Notifies track. Call it OnWeaponFired. If your character fires two weapons add a second notify and call it then OnLeftWeaponFired and OnRightWeaponFired instead
Creating your character base class
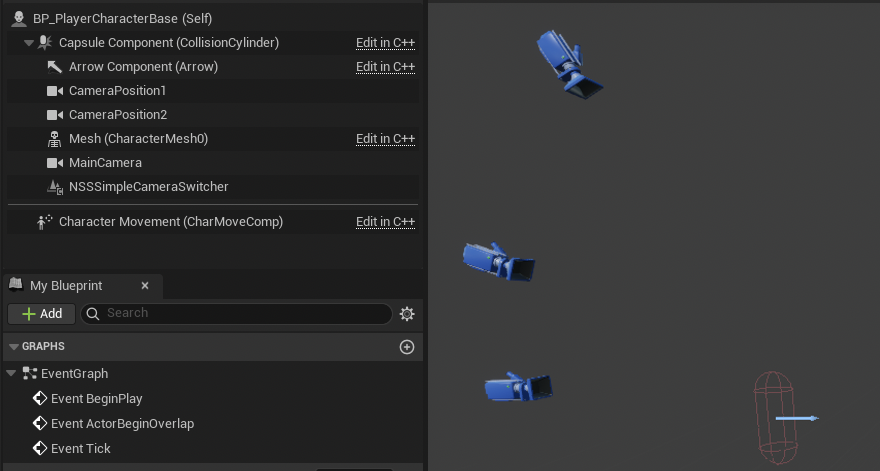
- Go to your Characters/Playable folder and create a new blueprint deriving from NSSPlayerCharacterBase. Call it BP_PlayerCharacterBase and double click it to open it up
- OPTIONAL: Add a NSSSimpleCameraSwitcher component
- Add at least one Camera and call it MainCamera and place it where you would like it. If you added the camera switcher component in the previous step you can leave the camera anywhere, it won’t matter. Then create a number of extra cameras and place them where you want them to go. You can add as many as you like
- If you added the Camera Switcher component above, select the Camera Switcher component under the Components tab and in the details panel select CameraSwitching_Curve under the CameraCurve drop down. For now, forget about the MainCamera and CameraActors fields
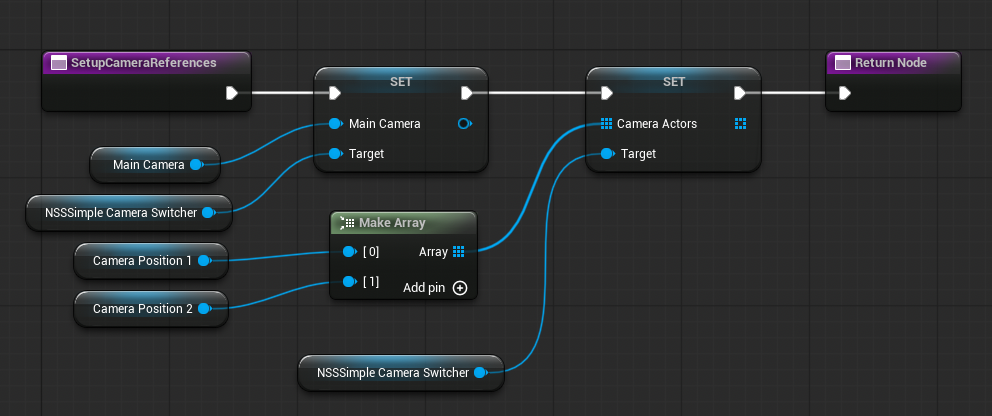
- To finalize camera switching, create a new function called SetupCameraReferences. Inside here set the MainCamera value on the Camera Switcher component and also create an Array node for the Camera Actors field. Inside this array, specify the order that you want the cameras to toggle between
Modifying the EventGraph
- Add a variable of type NSSPlayerSpawnerBase and call it PlayerSpawner. This will be used by all your player characters later so add it to the base class now
- Next we create the BeginPlay event to setup EnhancedInput and to set the value of the PlayerSpawner variable. We do this in 3 phases:
1. We call SetupCameraReferences
2. We add the enhanced Input Mapping Context and select the one we created earlier
3. We use GetActorOfClass to find our PlayerSpawner in the scene and assign that to PlayerSpawner
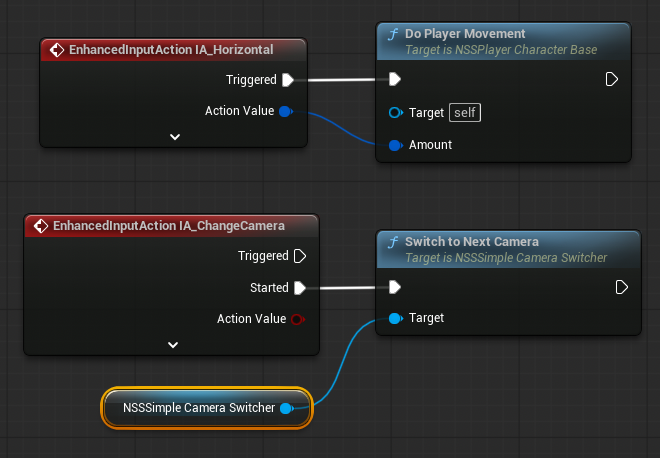
- Next we attach our input buttons to actions. The actions are already defined in the plugin so set them up like follows
- Lastly, we create an event dispatcher called OnReadyToStartShooting. Basically, our character will not start shooting until this event was called. This will give us a chance to play an opening animation on the character before we start firing
CREATING THE MAIN CHARACTER
- Go to your Characters->Playable folder and create a child blueprint from the BP_PlayerCharacterBase blueprint. Call it BP_PlayerBelica
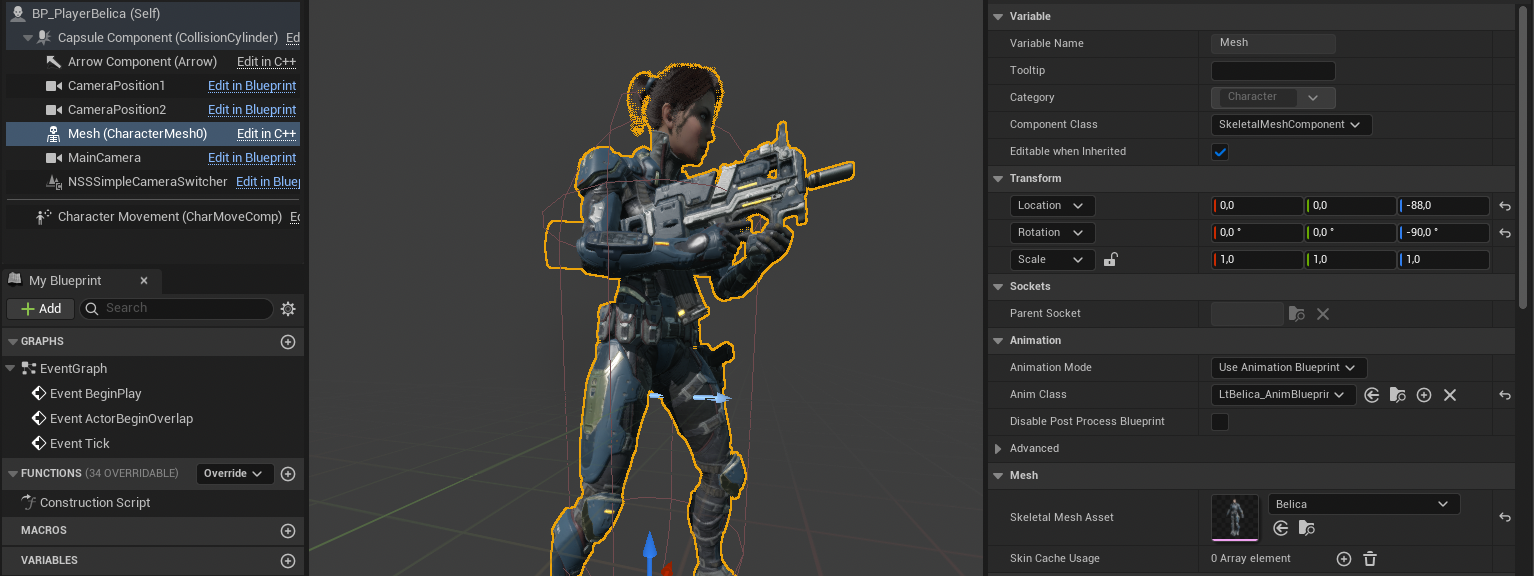
- Open it up and click on Mesh in the Components tab. In the Details tab select Belica for the SkeletalMeshAsset then select her AnimBlueprint from the dropdown
- Adjust her location to be -88 units in the blue field and her rotation to be -90 in the blue field also
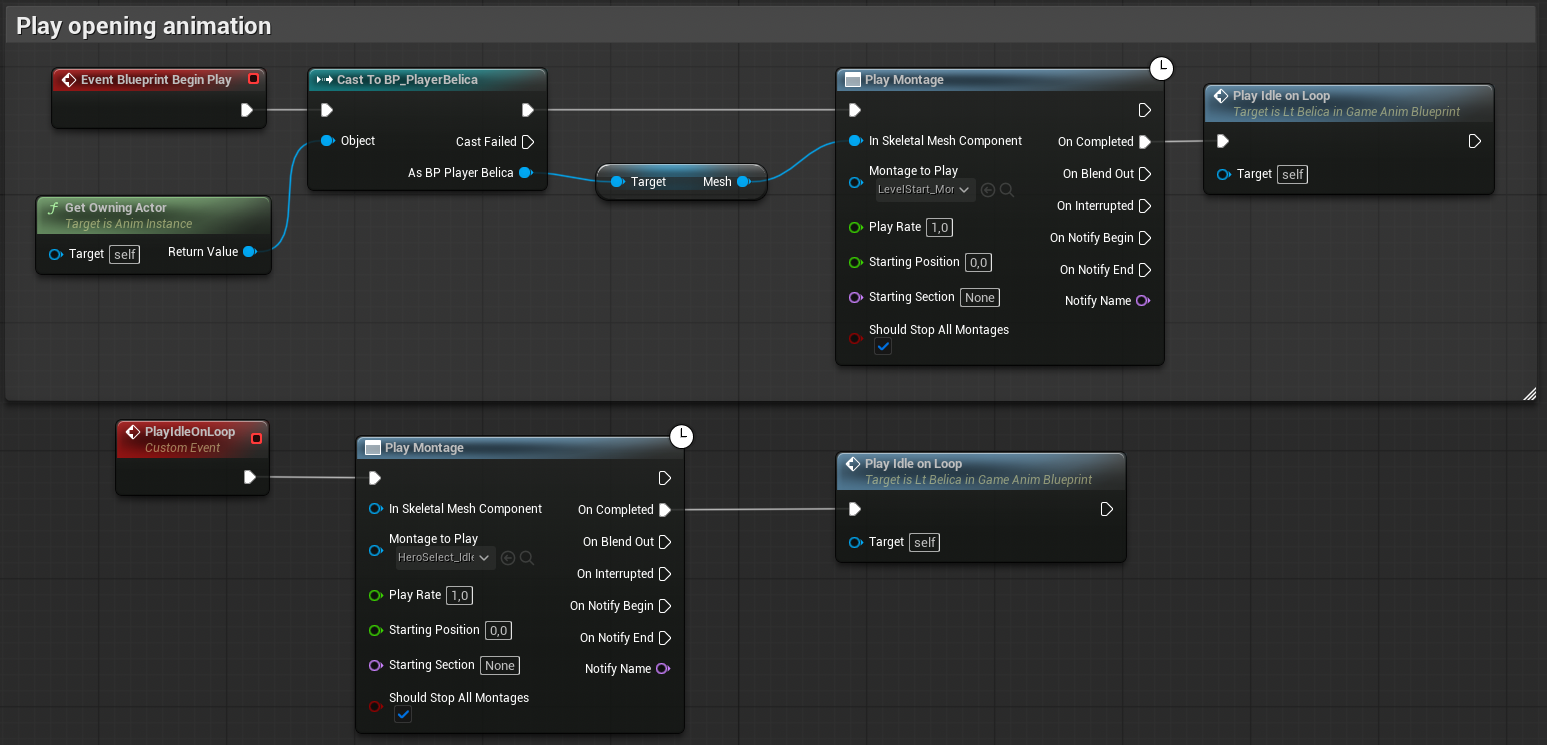
- Next we setup the EventGraph to always play the firing animation
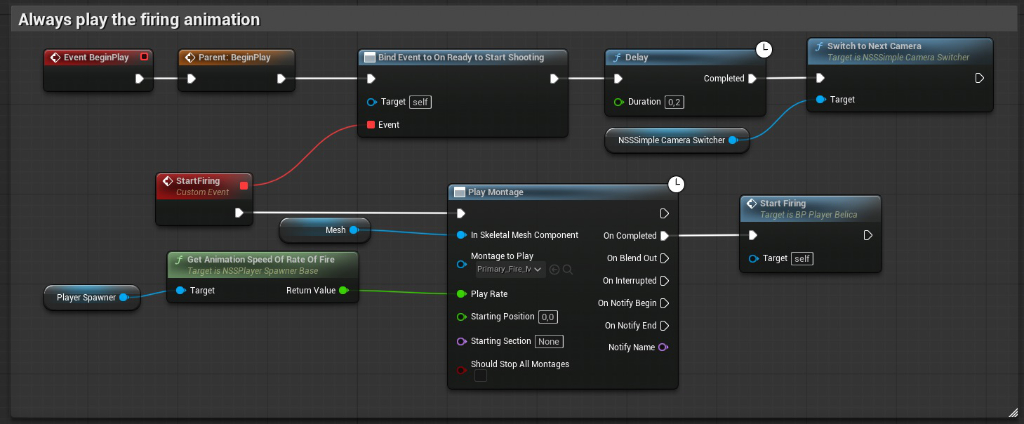
First we bind an event to OnReadyTostartShotting so that we only start firing after the opening animation has played. Then we wait a short while for the camera setup to complete and then call SwitchToNextCamera to position our camera at the first camera position specified on the Camera Switcher component. As for the event we just created, we can call it anything we want but I called it StartFiring. The logic is simple: Get the current fire rate from the PlayerSpawner in the scene, set it as the animation speed and play the firing animation. Once the firing animation is complete we call the same event again to create an infinite firing animation that respects the playback speed specified by the fire rate
Creating the SubCharacters
Subcharacters are truly simple characters that copy their pose from an external source. They need a firing function but that is also called from an external source. It just needs to exist
- Start by creating a new Animation Blueprint from your characters skeleton and place it in Blueprints/AnimBP. Call it LtBelica_InGame_AnimBlueprint then double click to open.
- Add these variables:
1. bool called IsFollower
2. SkinnedMeshComponent called Skeleton
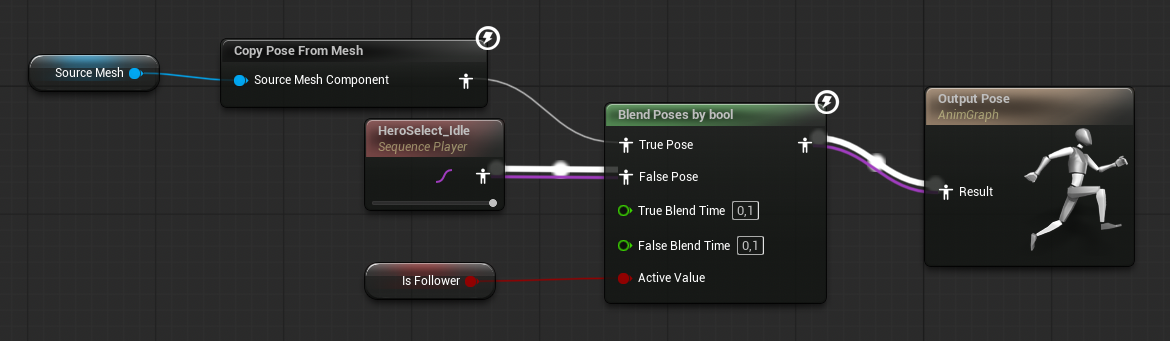
3. SkeletalMeshComponent called SourceMesh - For the AnimGraph we drag in an idle animation (in this case HeroSelect_Idle) and we create a Blend Poses by bool node and tell it “If this is a follower, copy the pose from SourceMesh else play the idle animation”. This way we can display the character on top of destructible obstacles and use it as a subcharacter around the player. A two for one, if you will.
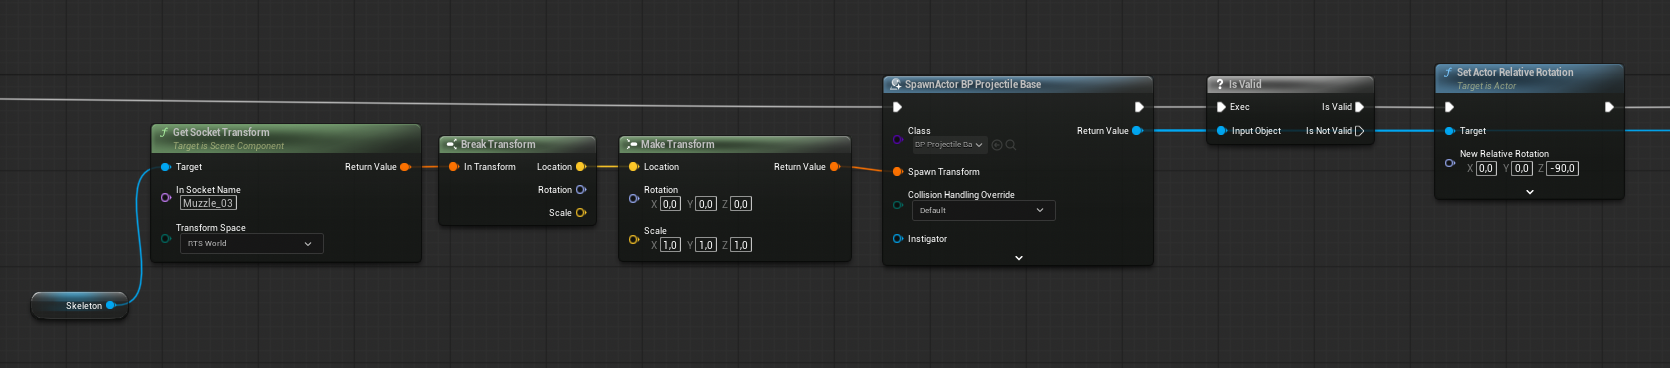
- Next we need to create a function called FireWeapon. In here we get the transform of one of the character’s Muzzle points (if present or we have to create one of our own liking on the player’s skeleton) and then we break it into it’s base components. We only care about the location here. We span our character’s projectile here then we manually set its rotation to (0,0,-90) to make it face down the path. That is all we do here.
- Optionally, if you have a muzzle animation you can spawn that here also
- On to the EventGraph. Here we play an opening animation montage and once that is done we trigger a loop that plays an idle animation montage.
- Go to your Characters/Playable folder and create a new Pawn blueprint. Call it BP_InGamePawn_Belica
- Open it up and add a capsule collider component. Leave everything set to defaults but ensure Capsule Half Height is set to 88 and Capsule Radius is set to 34
- Add a SkeletalMeshComponent as a child of the capsule. Set it’s Skeletal mesh to Belica and it’s animation blueprint to the one you just created. Don’t rotate the mesh. Only set it’s height to (0,0,-88)
- Save everything. You are finished creating the main sub character. To add skins now is a walk in the park. See a later section for details.
Creating the player select preview characters
- Go to your Blueprints/AnimBP folder and create a new Animation Blueprint from the Belica skeleton. Call it LtBelica_Preview_AnimBlueprint then open it up
- For the AnimGraph we only need an idle animation so just drag that in and connect it to the final pose

- Go back to your Characters/Playable folder and create a new Actor blueprint. Call it BP_PreviewBelica and open it up.
- We don’t need a capsule this time so just add a SkeletalMesh component
- Set it’s Skeletal Mesh Asset to Belica and it’s Anim Class to LtBelica_Preview_AnimBlueprint.
Finally we need to setup the main animBlueprint
- Open the character’s AnimBlueprint from the Animations/AnimBP folder
- Create a variable of type NSSPlayerSpawnerBase and call it PlayerSpawner and a BP_PlayerBelica variable called Character
- She is already setup to move so we don’t need to do anything in the AnimGraph except make sure we are not using an AimOffset blendspace.
- In the EventGraph we can leave the animation nodes alone and focus on the BeginPlay node only.
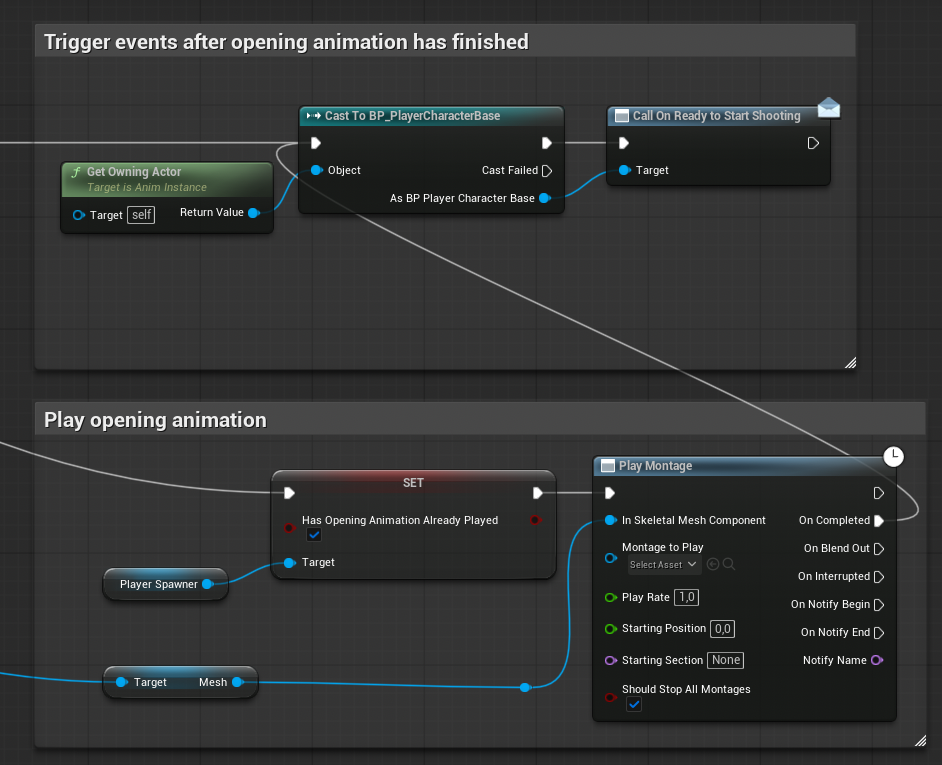
- In BeginPlay we want to get and set the values for Character and PlayerSpawner variables.
- Next we check on the PlayerSpawner if the opening animation has already been played and play it if not.
- We end off by triggering our event to say “We are now ready to start firing”

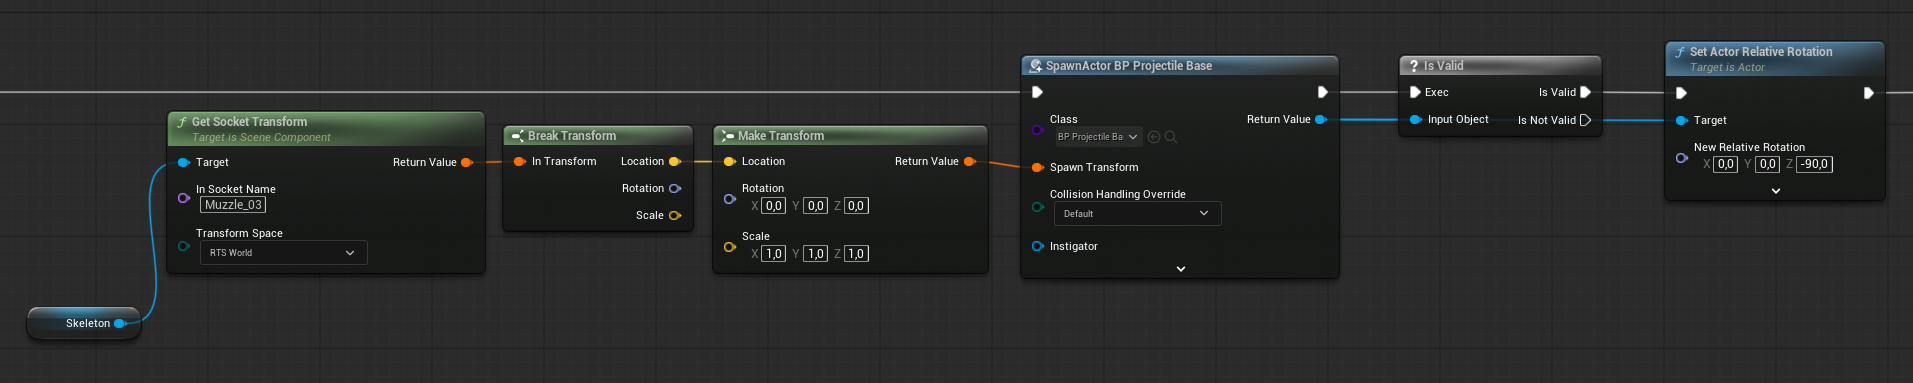
- Now we need to create a function to Spawn our projectile. Call it FireProjectile. This is basically going to be a clone of the function we created in the SubCharacter earlier.
- First we get the muzzle flash socket from the skeleton then we break its transform since we only care about the position. We then spawn the projectile and manually set it’s rotation to make it look down the path towards the enemies
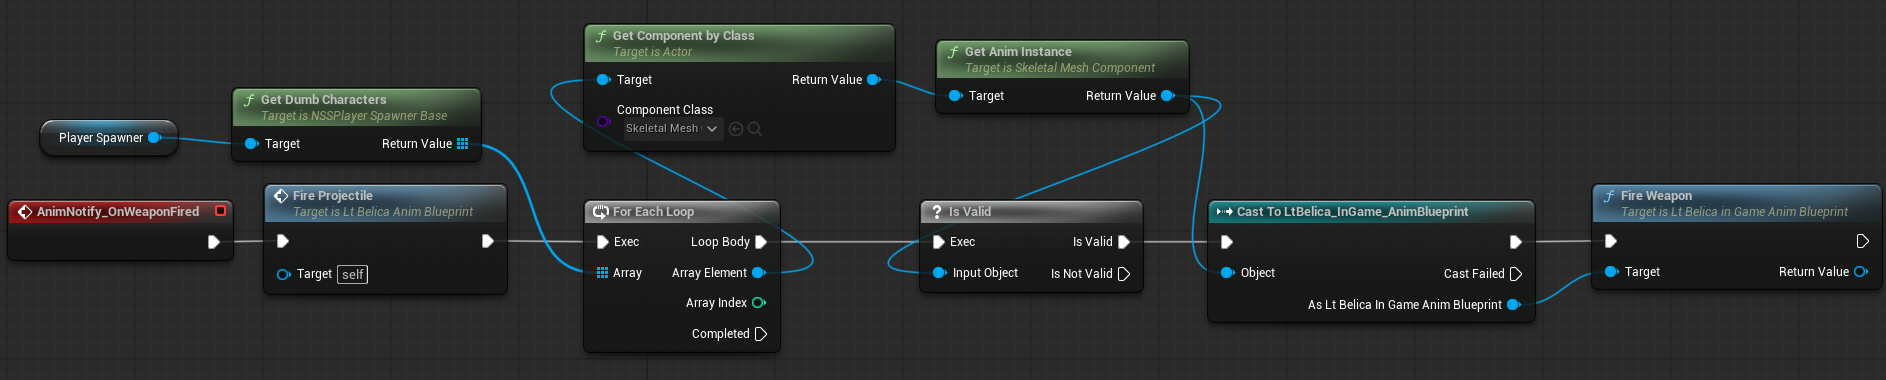
- In the EventGraph we respond to the AnimNotify from the fire animation. Create a AnimNotify_OnWeaponFired node and call the function you just created. Next we make use of the player spawner to get a reference to all the sub characters you have spawned and we call the firing animation on each of them also
Go to your Characters/Playable folder and create a child blueprint from BP_PlayerBelica. Call it BP_PlayerBelica_Biohazard.
Open it up, select the mesh and in the details panel change the Skeletal Mesh Asset to Belica_Biohazard.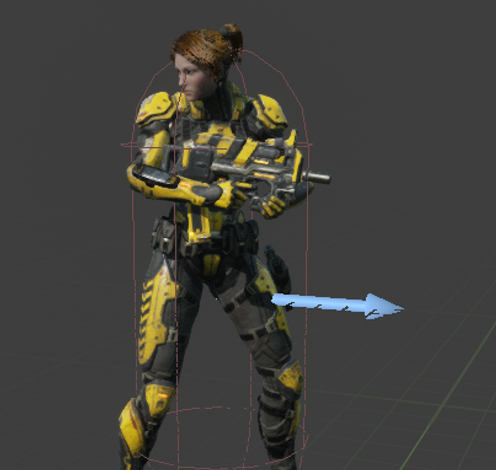
Save and repeat this process for BP_PreviewBelica and BP_InGamePawn_Belica
Now repeat this process for any other skins you want to add
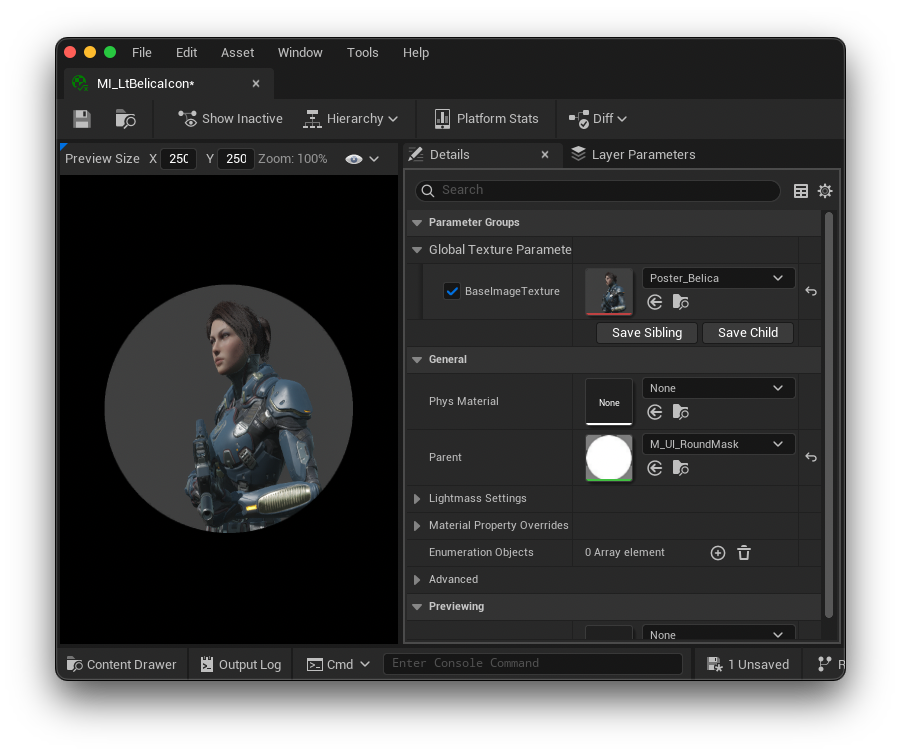
Each player character needs a Texture to display in the character select screen. This can be any texture you create in your DCC tool of choice.. For this tutorial I took a screenshot of the characters in their Preview blueprints.
In game, though, we use a rounded off icon to represent them. For this we need to create a new material with the corners clipped.
- Go to the Materials folder and create a new folder called PlayerIcons.
- Go to the Materials folder and create a material instance from M_UI_RoundMask material by right clicking on it and selecting “Create instance”
- Move it to Materials/PlayerIcons
- Open this material inside of the PlayerIcons folder and for the BaseImageTexture select your Belica poster and save
- Duplicate this material and open it up.
- Change the BaseImageTexture to your Biohazard poster
- Repeat this process for all other Player skins you created
O nice you have created an enemy character you can use it either for the mob or as a boss
- Go to your Blueprints/AnimBP folder and create a new animation blueprint based on FeliCas skeleton and the NSSEnemyBaseAnimInstance class
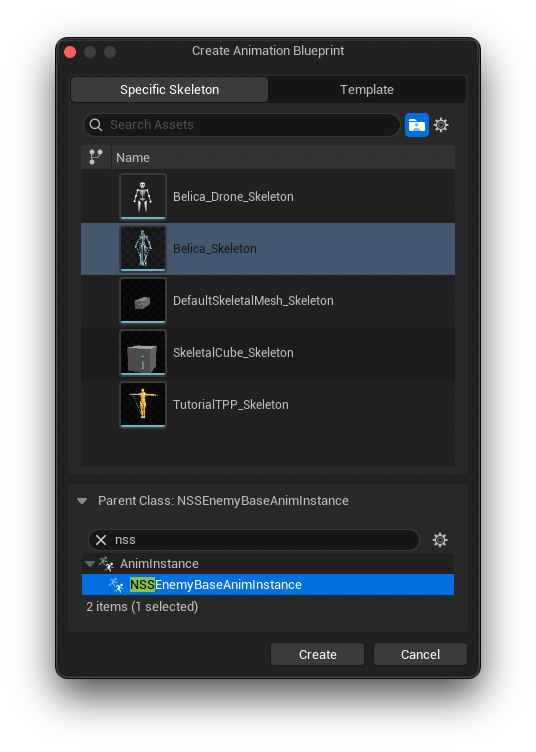
- Call it EvilBelica_AnimBlueprint and double click to open it up
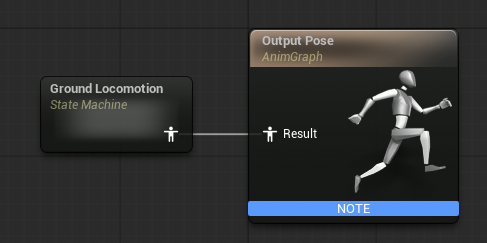
- For the animgraph create a state machine called GroundLocomotion
- Inside this we need two states only: Walking and Attacking with the transition set to the value of the IsBusyAttacking boolean
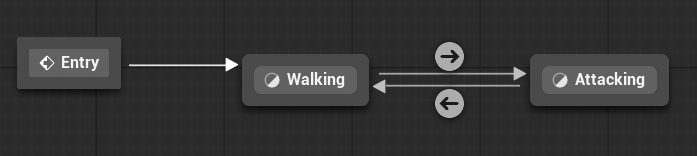
- In each of these states simply drag in a relevant walking or attacking animation and attack it tot he output pose for that state
- In the attacking state, though, we need to add some event notifies to the firing animation. We need to know when in the animation the actual attack occurs (for melee attacks when the weapon hits and for projectile weapons just before the recoil) as well as when the attack ends so add an OnAttacking and an OnFinishedAttacking event notify to the Notifies track on the animation file. You can take creative freedom here, though. It doesn’t need to be too precise. Just take note that when the OnAttacking notify triggers the player will be dealt damage. When the OnFinishedAttacking notify fires the enemy will stop attacking and move off screen

- In the EventGraph all we have to do is respond to the two AnimNotify events.
1. For the OnAttacking notify we simply call OnAttackingNotificationSent. For the OnFinishedAttacking notify we have to test if we are currently attacking the player or the off screen trigger volume. If we are attacking the player we want to change the enemy’s state to “Moving Off Screen”. If the enemy is already off screen we change it to “End of life” to destroy it.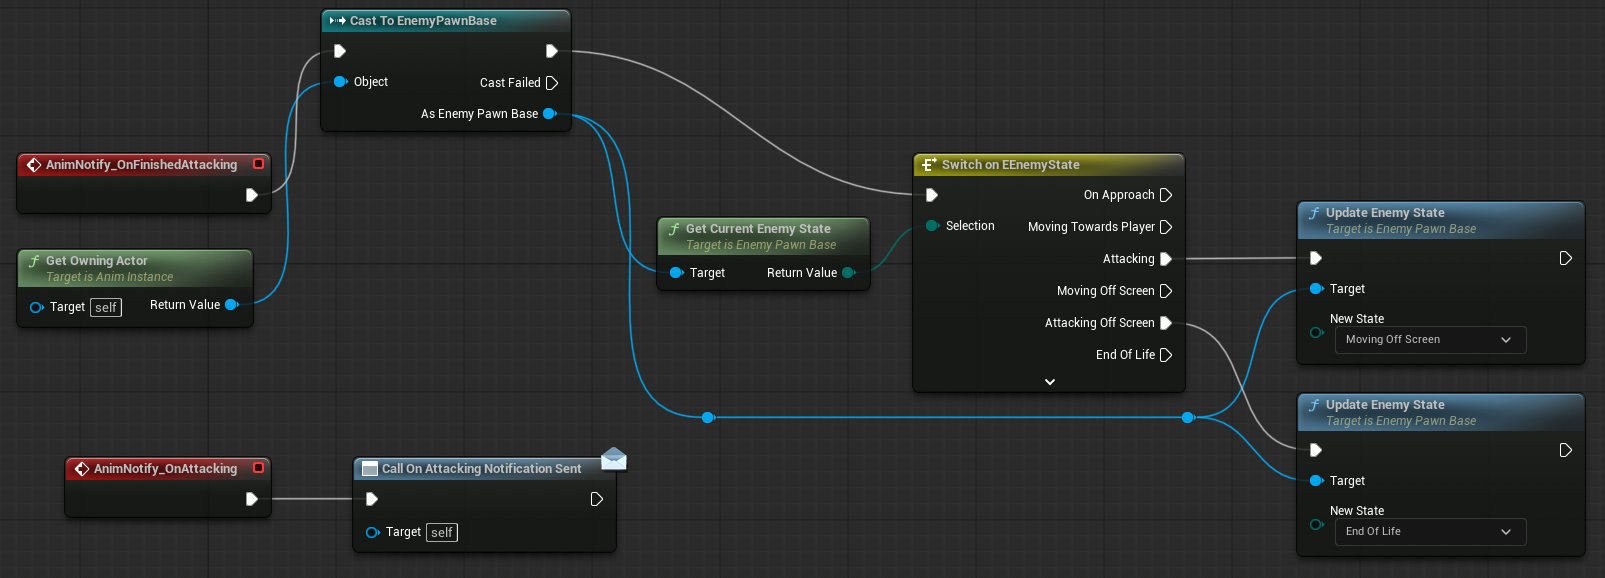
- Next we go to the Characters/Enemies folder and create a new blueprint deriving from EnemyPawnBase and we call it BP_EvilLtBelica
- Add a CapsuleCollider, a SkeletalMesh component and a SimpleMoveTo component.
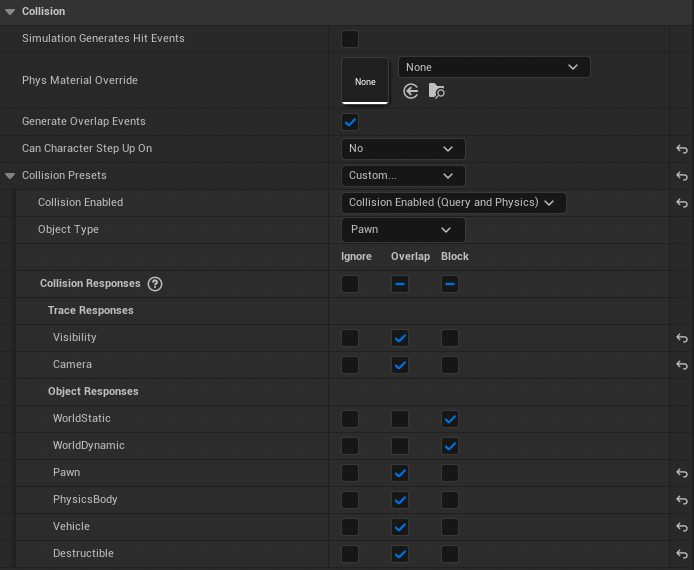
- Make the capsule the root scene object and set it’s half height to 88 and it’s radius to 34. Set its Collision like so
- Under the SmartMoveTo component, find the Movement section. This is where you specify how fast the enemy walks down the corridor and how far from the player it starts attacking

- Set the Skeletal Mesh asset to Belica_HeavyArmor (or any LtBelica skin you prefer). Set it’s position to (0,0,-88) and it’s rotation to (0,0,-90)
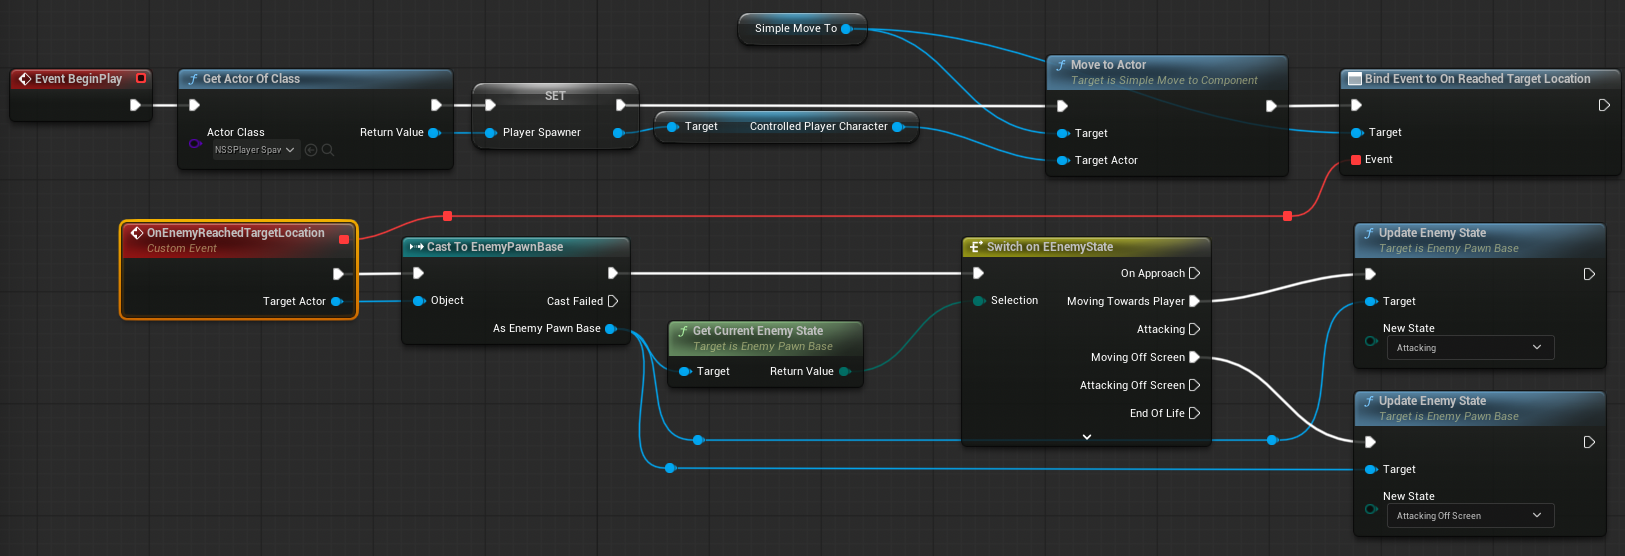
- Next we need to do some work in the EventGraph. Create a new variable called PlayerSpawner of type NSSPlayerSpawnerBase
- Next we need to do three things:
1. Find the player actor and move towards it
2. When the enemy reaches the player, start attacking the player
3. When off screen, attack the off screen bounds (this will destroy the enemy pawn) - We achieve the last two things by binding an event responder to the OnReachedTargetLocation event and switching on the enemy state at the time
To spawn your enemies via the MASS plugin you need to create some Data Assets but that is an entire tutorial on it’s own. Either migrate them from the Sample projects or follow this tutorial to set it up:
Your First 60 Minutes with Mass | Epic Developer Community
In either case, to get MASS to work and actually spawn the enemies you need to be aware of this part of the above tutorial
Before you PIE, the current form of Mass requires that a few processors have the flag Auto Register With Processing Phases enabled inside of the Mass settings. Without setting this flag, the Mass entities will not be visible in the game.
Open Project Settings and select Mass from the Engine section. Expand the Module Settings section under Mass. Expand the section for Mass Entity and again for Processor CDOs. Next, search through the array of processors for MassLODCollectorProcessor, MassVisualizationProcessor, and MassVisualizationLODProcessor. Expand the processors and manually enable the Auto Register with Processor Phases flag for each processor.
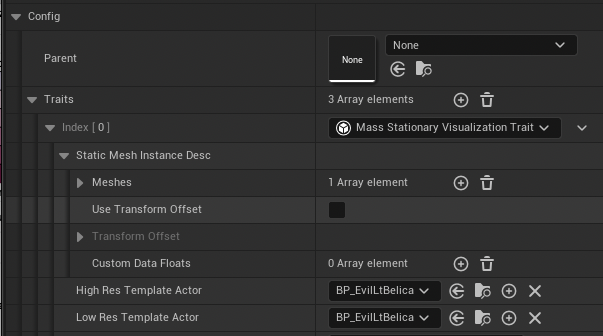
- Go to your DataAssets/MASS folder and open up DA_EnemyConfig
- Under the Mass Stationary Visualization Trait find the High Res and Low Res Template Actor and set both to your EvilLtBelica character
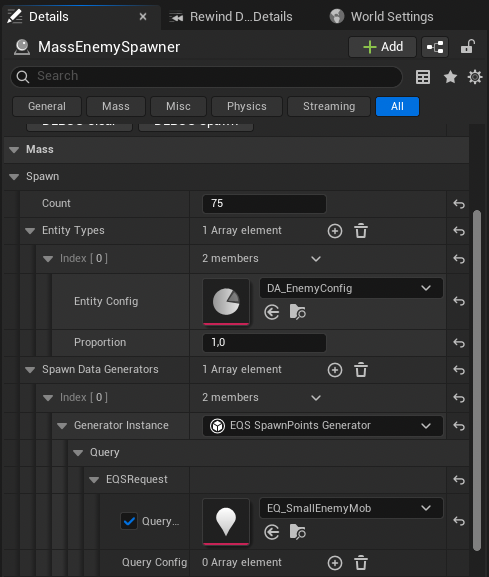
- In your map, select your MassEnemySpawner actor and configure it to use your two MASS DataAssets. You need to set Entity Config to DA_EnemyConfig and under EQS Request set Query to (in this case) EQ_SmallEnemyMob
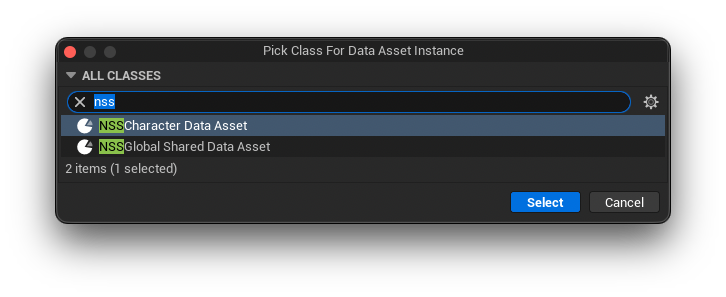
- Create a new folder called DataAssets
- Inside this folder, right click and select Misc->DataAsset and from the popup window select NSSCharacterDataAsset. Name it DA_PlayerInfo. Do the same with NSSGlobalSharedDataAsset and call it DA_LevelInfo
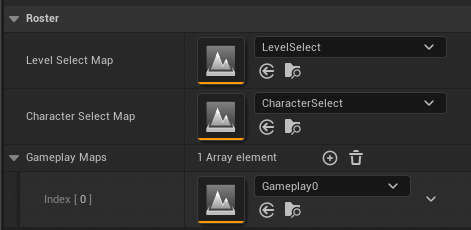
- Open up DA_LevelInfo and configure it as follows:
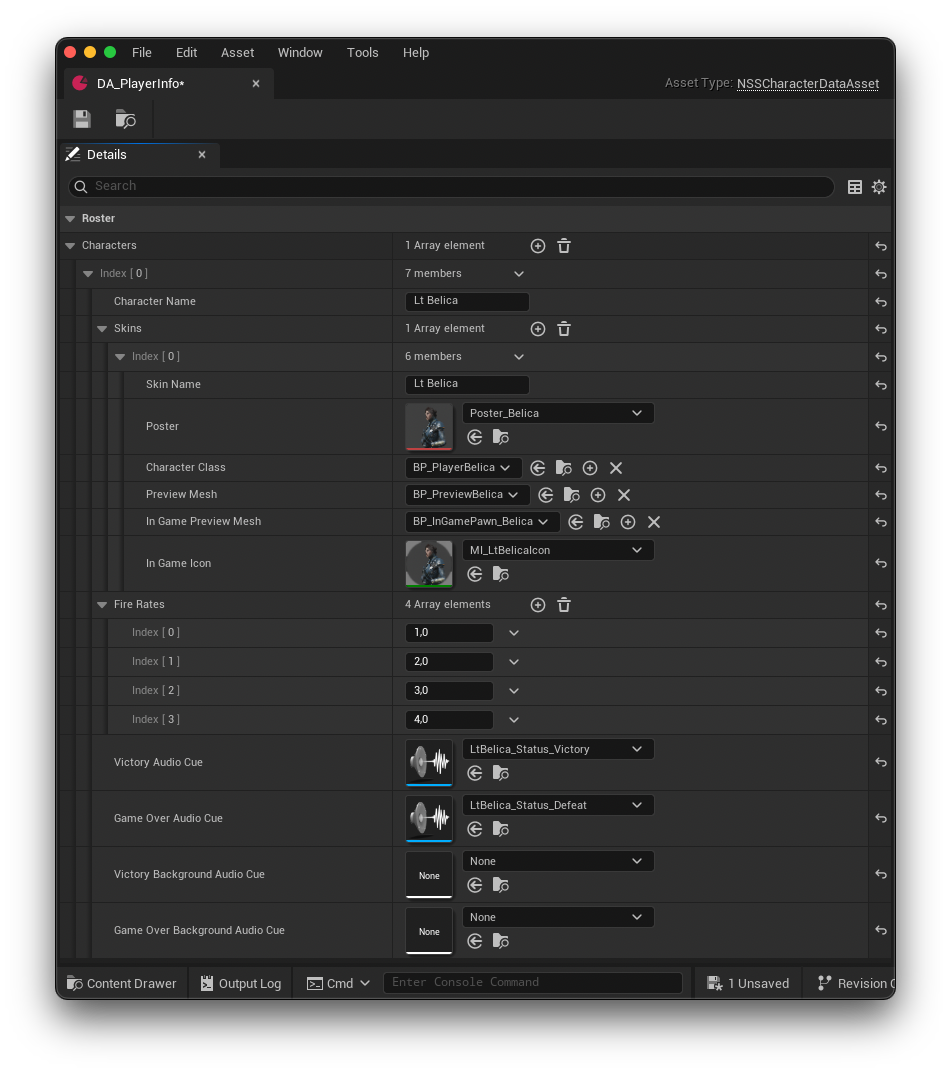
- Open up the DA_PlayerInfo and configure it like so for the first skin then repeat for all the others you created
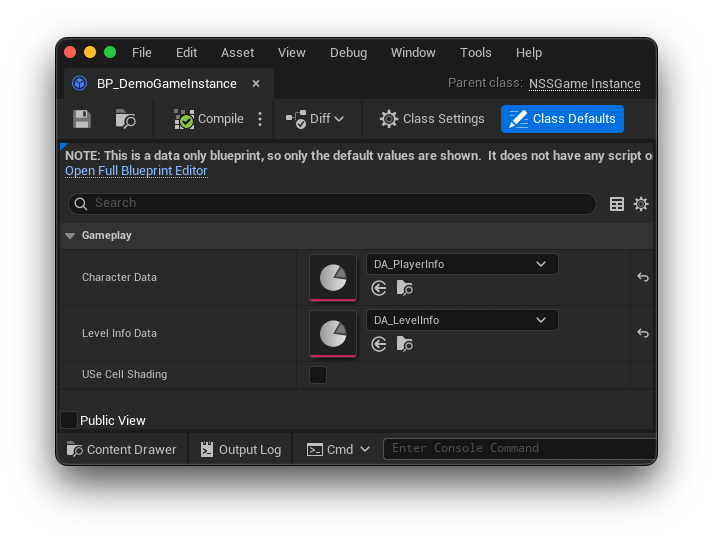
- Open Blueprints->BP_DemoGameInstance
- Set CharacterData and Level Info Data to the two assets you created above then save and close
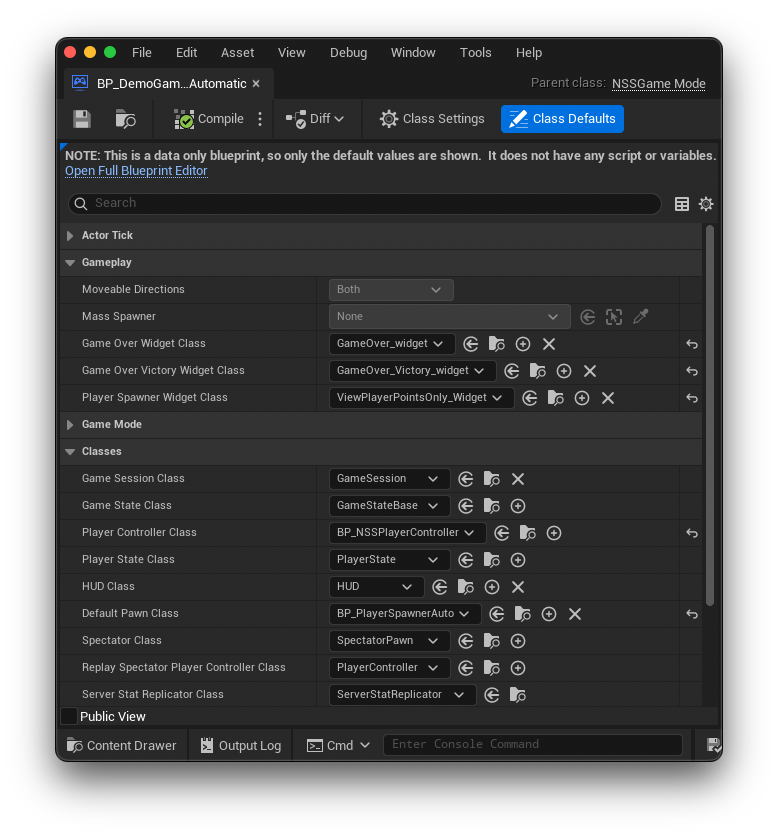
- Open BP_DemoGameModeAutomatic and setup the Gameplay section to use our respective widgets. Under Classes set the PlayerControllerClass to our BP_NSSPlayerController and set the Default Pawn Class to BP_PlayerSpawnerAuto
- Open BP_DemoPlayerSelectionGameMode and verify that everything is set to defaults except Default Pawn Class. Set that to BP_PlayerPreviewSpawner
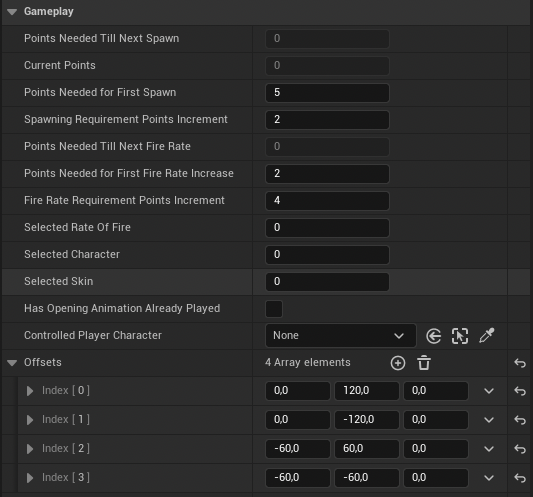
- OpenBP_PlayerSpawnerAuto and find the Offsets array under Gameplay in the Details tab. Your character will not spawn if this array is empty. In here specify the distance your sub characters should appear from your main character. They will spawn in the order that you specify here so it might be a good idea to enter values that circle your player unless you want a specific other formation
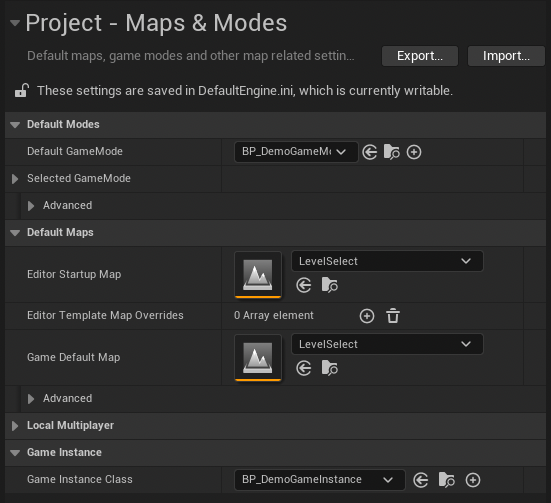
- Finally, open ProjectSettings and go to Maps & Modes
- Set Default GameMode to our BP_DemoGameMode, Set the Game Default Map to LevelSelect and set the Game Instance Class to BP_DemoGameInstance
 Save everything and close all open tabs