
Q: What is the WUTJPlacements script? Do I need it?
Q: I don’t want to use Tapjoy in my project. Can I still use WordPress Money?
Q: How do I create a virtual currency in WooCommerce that can be used in Unity?
Q: Can I sell other in-game content for Unity or only virtual currency?
Q: How do I get started?
The first thing you need to do is register for an account at www.tapjoy.com and download the SDK for Unity from https://ltv.tapjoy.com/d/sdks. Almost everything else is setup and done via the instructions on the Tapjoy website, here: http://dev.tapjoy.com/sdk-integration/unity/getting-started-guide-publishers-unity/.
 Just remember that you are setting up a self managed (also called non managed) currency. You wil be asked at some point to choose between managed and non managed currency and once it’s chosen you cannot change it afterwards.
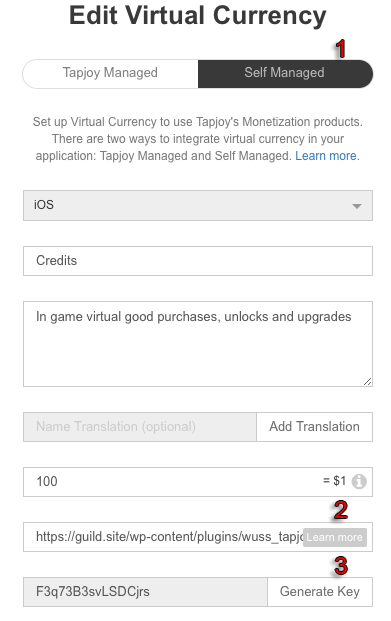
- When setting up your currency, make sure to select “Self Managed”
- For the callback URL use:
https://[mysite]/wp-content/plugins/wuss_money/tapjoy.php
If you are planning on building for iOS, Apple is now forcing you to use SSL. All http calls are going to be rejected soon.
[mysite] should point to the folder where you installed WordPress into. I.e. if you installed it into www.mysite.com/wordpress but you use your site by going to www.mysite.com, [mysite] needs to be www.mysite.com/wordpress
- Click to generate a key and write it down. This is the value you will need in your WordPress dashboard. You need to create a currency for iOS and Android so you will have to do all of this twice. Jut be sure to select IOS once and Android once and write down the keys.
What you call the currency is irrelevant (I just call mine Credits) as we will always call them “points” in WUMoney. Inside your game you can call them whatever you like.
 If you follow along with the installation instructions they will tell you of a “nice feature” that automatically logs you in to their service as soon as the app starts and they will tell you that logging in is very important and that is why it is a good idea to log in automatically as soon as humanly possible.
That is all well and good but if you read on and get to the placements tutorial you will see that they automatically show ads upon the game connecting to their servers. This is very bad for us because we don’t yet know who is supposed to be getting points for that ad. Nobody has logged in yet, nobody can get credit for it, but it still shows. This means the ad shows purely for the purpose of annoying your customers and doesn’t put anything in their pocket… which translates into many angry emails in your inbox. That or you must make sure to have no content in that placement.
Instead of using the AppLaunched placement that Tapjoy automatically calls, we use the “Logged In” placement instead. We manually log in to Tapjoy after someone has logged into WordPress. Only once we know who is playing do we tell Tapjoy who is playing and only after they say “Okay, got it” do we trigger the Logged In placement.
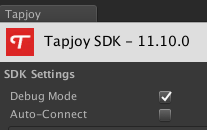
Thus, in Windows->Tapjoy, I recommend turning off the Auto-Connect check box just to avoid mishaps but that is optional. What is NOT optional is to make sure you have nothing in the AppLaunched placement that Tapjoy automatically creates for you.

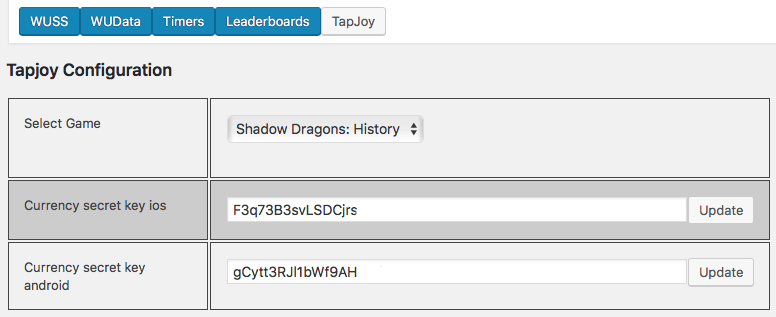
Now that you have your two self managed currencies defined for your game (one for Apple and one for Android devices), it is time to let WUSS know about it so log into your WordPress dashboard, go to the WUSS menu and click on the Money button (In this image it is still called Tapjoy). Enter the two keys you wrote down earlier and hit update beside each one, making sure you have the correct game selected from the dropdown.
You are now done and are ready to start using Tapjoy placements in your current and future games.
For more info on Tapjoy virtual currency, see http://dev.tapjoy.com/virtual-currency/
For info on non managed currency, specifically, see http://dev.tapjoy.com/virtual-currency/non-managed-currency/
Q: What is the WUTJPlacements script? Do I need it?
 Tapjoy allows you to create as many placements as you want and allows you to call them what you want, although they do have a list of recommended placements. I have created an enumeration of those recommended placements as well as generic ones like “Video Request”. Getting placements to work inside your game takes a bit of reading, getting used to and some coding. You are gonna be spending a bit of time in the demo project, that is for sure.
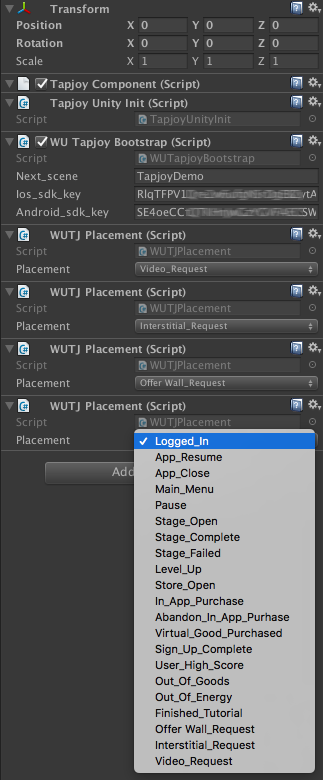
WUTJPlacement offers you a trade off. If you sacrifice your freedom to choose any placement name you want and instead use the recommended placement names instead, I will save you the headache of first having to learn how to implement the placements and just do it all for you. Simply drag an instance of this component onto the Tapjoy prefab, select the placement you want to use from the dropdown menu, make sure you name your placement the same in Tapjoy (making sure to replace the underscore with a space. Example, in the drop down you would select “Logged_In” but in Tapjoy your placement should be called “Logged In”, without the underscore). Now you can trigger your placement at any time from anywhere with the only line of code you need to write:
WUTJPlacement.ShowPlacement(eTJPlacements.Video_Request);
So, what is it? It is a means to get you up and running super quickly and with minimal fuss. Do you need it? Not really, no. In time you might want greater control over your placements and at that time you might find it a bit limiting. Personally, I feel using only the 4 placements shown in the image is all I think I will ever end up using…
Q: I don’t want to use Tapjoy in my project. Can I still use WordPress Money?
Absolutely. Simply go to Edit->ProjectSettings->Player and select the “Other Settings” tab. Look for the “Scripting Define Symbols” field and delete WUTJ.

Tapjoy is now no longer used in the kit so go to the bootstrap scene and remove the TapjoyUnity object from it. Open the Build Settings, click Build And Run and make sure to select “Replace” when asked so you replace the current Xcode project.
Q: How do I create a virtual currency in WooCommerce that can be used in Unity?
All you need to do is create a wooCommerce product like you normally would, giving the product a title so people know what they are buying, some graphics, some text etc. Then you need to make sure the product is a “Simple product” type, is marked as virtual and not downloadable.
All that remains now is to create a product SKU according to the required format for WUMoney to isolate Unity products from other products in an order. The format is as follows: WUSKU_{GameID}_Money_{CurrencyName}_{Qty}
An example SKU: WUSKU_8_Money_Gold_100
Since you will most likely be selling packs of 100’s or 1000’s of coins as a single product (as opposed to telling the player: “One coin costs 1 cent so just enter any qty you want and pay me that much”) but since WooCommerce’s cart has a quantity field where users can specify how many of your product they want to buy, the actual number of currency players get from a purchase is the Qty you set in the SKU multiplied by the number of products purchased.

Q: Can I sell other in-game content for Unity or only virtual currency?
I will be creating more content that you can sell and adding them into the relevant asset as I do so. In the mean time, if you want to sell items that I do not yet support, doing so is very easy but you will need to know how to code in PHP and have an understanding of how WordPress works.
Step 1 is to create a new script and to make sure WordPress loads it. That is the advanced part that requires the WordPress understanding. Alternatively, you can add your custom code to a script that does already get loaded but then you need to be aware that updating that script in future will delete anything you added to it. If you have the PHP and WordPress knowledge to still want to move forward, here are the four things you need to do:
-
When you create your SKU, make the third part something unique to your product. This can be anything as long as you are sure it will be unique to your product and not something I will likely use in a future product of my own.
Example: WUSKU_8_KEYS
NOTE: SKU’s only need those three parts. You can append as many additional parts as you want (if any at all) or add additional info to the product’s meta information instead, if you prefer. Both are acceptable and will be sent to your function
-
Register your function to my action. NOTE: The function name must be unique!
Example: add_action( ‘wuss_purchase’, ‘MyUniqueFunctionName’ );
-
Create your function and give it one argument only. See the documentation for what info is included in this array:
function MyUniqueFunctionName($args)
-
Finally, since your function will not be the only function responding to the product sale, you need to test the third part of the SKU to make sure the product should be processed by your function. If not, then quit.
A complete example of what your script should look like:
< ?php

add_action( 'wuss_purchase', 'MyUniqueFunctionName' );

function MyUniqueFunctionName($args) {

    if( $args['type'] != "KEYS") return;

    //your code here

}

?>
And that is all there is to it.